Wednesday, December 9, 2009

Viva Las Vegas Stamps

I'm back....  Had a terrific time in Vegas!  One of the highlights of the trip was a visit to Viva Las Vegas Stamps.  Meeting Wayne was great... and the stamps......OMG all the stamps!!!!!!

Getting to the store is a little tricky.  Fortunately I had printed out the directions from the website.  We ended up telling the cab driver how to get there. 

When you finally find the store you need to ring a bell to get buzzed in!  The magic begins as you walk through the entry hall.  Once you open the main door......be prepared to be amazed!  Stamps, stamps, and more stamps!  There is even a hugh poker table loaded with unmounted rubber for you to dig through.

Here are a couple of pictures to tease you.  If you get to Vegas be sure to visit Viva Las Vegas Stamps.

Viva Las Vegas Stamps

Viva Las Vegas Stamps

Viva Las Vegas Stamps

I also made a short video for my friend Tracy.


Enjoy!

Sunday, November 1, 2009

And now for something completely different.....

I WON... I WON... I WON... At work there is a contest every year.  One of the companies that we write policies for (I sell insurance) sponsors this contest and the agency with the highest volume of sales in a set time is entered into a drawing for a trip for 2.  This year our agency won a trip for 2 to.....  are you ready???  LAS VEGAS !!!!!  Since the owners of the agency don't use the trips they hold a drawing among all the employees to see who gets to go.  AND I WON !!!!!! 

I have always wanted to go to Vegas and I'm jumping up and down with excitement.  I've asked my sister to go with me and she was very touched that I asked her instead of a friend.  We fly out December 2nd and return on the 6th.  Airfare and hotel is included along with a LARGE cash bonus!  We will be staying at the MGM Signature Resort (click here to check this out)  We will have a Junior Suite.  What a fancy place!

Best of all is the fact that in Las Vegas is a rubber stamp store that you don't want to miss.  Viva Las Vegas Stamps is right off the strip.  They have over 100,000 stamps in the store and they make 15,000 stamps of their own!  OMG....  I'm taking an extra suitcase!  LOL  Check out their blog for videos of the store.  You will drool over all the stamps.

LAS VEGAS HERE I COME....

Confirmation Blessing Card

Confirmation Front

Sorry to be away so long.  Sometimes life takes us away from our hobbies for awhile.  October is one of the busiest months of the year for me.

I'm starting out November with a card I made for my friend's son's confirmation.  It is the first religious card I have ever made but I think it came out ok.

I found the designer paper and the cross stamp at Hobby Lobby.  I tried to keep it simple and relied on my "comfort zone" to create the card.   I stamped the cross and then heat set with clear embossing powder.  The silver thread is the elastic kind and was really a challenge to work with.  Pull to tight and the card curls, not tight enough and it lays crooked!  I added the fish charm to dress it up and even though this is for a guy I don't believe it makes the card to girly.  What do you think?

The inside verse I found on the internet and I printed it off using my computer.  (click the picture for a larger view)

Confirmation Blessing

I hope it is appropriate.  Your opinions are welcome since I have never done something like this before.

Tuesday, October 6, 2009

Lizard Birthday Card

Lizard

My Son's birthday is coming soon and since I have a hard time designing cards for guys I figured I better get started early.  This simple card came together pretty easy since my friend contributed the burgandy cardstock and the ribbon.  I found the patterned paper at a garage sale this past weekend.  The circles have a glossy shine to them so I stamped and embossed the lizard to coordinate with the paper.  After I took this picture I went back and colored in the stars and eyes on the lizard with a gold sparkle gel pen.  Since I wanted to tease my son about getting older the inside says "You may be old, but you're not extinct!".  He will love that!

Monday, October 5, 2009

Lil Lady Card

Lil Lady
I spent Saturday evening scrapin with a friend until the wee hours of the morning!  We had a blast and around midnight we decide to have a contest.  We pulled out 2 sheets of purple cardstock, 1 sheet of Very Vanilla, a 2003 stamp set called Cute as a bug (Stampin Up) and said we each had to make a card using one of the images from this set and could only use the 2 purple cardstocks.  Anything else in my scrap room was ok to use. We sure did a lot of giggling!  But here is my final card.  Give this a try next time you get together with friends.  It made a great ending to our evening. That and all the chocolate we were eating!  LOL

Sunday, October 4, 2009

Birthday Dress Card

Dress

I created this dress card for my DGD's 2nd birthday.  I found the template here.  The steps I used to make the card are:
1. Print the template onto cardstock of your choice.  For mine I used Stampin Up's Whisper White.
2. Cut out the template.
3. Lay the template on top of patterned paper so that the shoulder fold is at the edge of the paper.  Trace around the template on to the patterned paper.  You are only going to trace the large (back) side of the dress.
4. Stamp your images onto the front side of the card.  Color in as you wish. I used an aqua brush and Stampin Up inks.
5. Cuddlebug the card.  I used the swiss dots folder.  It took 3 passes to do both the front and back.
6. Score and fold the dress.
7. I used a 1" circle punch to create the neck opening. Put your punch 1/2 way over the fold to create a 1/2 circle on the front and a 1/2 circle on the back.
8. Punch a 1" circle into a scrap of cardstock to begin to create the collar.  Use a scalloped circle punch centered over the 1" hole and punch out.  (I ran mine through the Cuddle Bug before glueing it down) Cut this in 1/2 and glue 1/2 to the front around the neck opening and the other 1/2 to the back.  I found this worked better than just folding the scalloped circle and gluing it down.  When I did that and opened the card the collar popped off.
9. Glue the patterned paper inside the dress.  Trim with an Xacto knife if necessary to get a clean fit.
10. Ink all your edges.
11. Add ribbon and any other embellishments you want.  I added stickles to the bee's wings and some of the flowers.
Now you have a darling little dress card!

Thursday, October 1, 2009

Birthday Shoe

Birthday Shoe
A quick birthday card for you tonight.  I used the shoe from my Happily Ever After cartridge and Design Studio to create the card.  All the pieces were cut at 5 1/4".  I had the paper and ribbon in my stash and thought they would make a cute shoe.  The shoe looked very plain so I added the ribbon and buckle.  I think it addes a nice finishing touch.  The edges of the patterned paper were inked with Walnut Stain Destress Ink.  Glossy Accents worked great to adhere the bow to the paper. 

Photobucket

The inside verse was computer generated.  I used one of the negative images to trace around the words and then cut it out to fit the inside of the shoe.  The one bad thing about this card is that it does not stand up.  If you look at the shape of the shoe it is goofy.  Next time I make this I'll try and alter the shape.

Thursday, September 24, 2009

Baby Carriage Card

Baby Carriage Front

A gal I work with is going to be a 1st time Grandma and the shower for her son and daugher-in-law is this weekend.  All of us at work chipped in to get the gifts and I volunteered to make the card.  Since the baby's room will be done in monkeys I had to incorporate one somehow. 

I saw this card created by Jill (click here) that is so adorable I had to case it.

The cardstock is Wild Wasabi (sorry the pictures are goofy.  My lighting was off.)  I had to improvise since I don't have the Big Shot Dies, so I used my coluzzle circle template to cut the circles.  I overlapped 2 of them so that the card would open on the side.

The Designer Paper is Stampin Up Delicate Dots and the flower stamp in the center of the wheels is from a Stampin Up set called Looks Like Spring.

The monkey was cut on my Cricut using the New Arrival Cartridge.  I added tiny beads for the eyes. 

I computer generated the Welcome Little One saying and then punched out with an oval punch.

Baby Carriage Inside

I also computer generaged the inside verse.  (If you click on the picture you can read it better.)

The back of the card was decorated too.  I got carried away I guess!  Because I even cut a monkey to put on the front of the envelope...

Baby Carriage Back

So there you have it.... my first carriage card.  Isn't this cute?

Sunday, September 20, 2009

No cards, just a quick note...

I've been busy preparing for the Stampin Up party I'm hosting today.  Made 2 yummy desserts... Chocolate Vanilla Swirl Cheese Cake and Strawberry Margareta Frozen Dessert.  I also made White House Punch.  It is one of my favorite punches.  It has a nice clean citrus flavor and goes nicely no matter what you are serving.  I didn't want a punch that's flavor would clash with my desserts.  I know, I'm so picky!  LOL  I finished all the "thank you" sheep too.  It should be lots of fun.  My demonstrator has so many new things to show us.  I can't wait!  Have a great Sunday all.

Monday, September 14, 2009

New Layout?

I finally changed my blog layout to be 3 columns. Although my followers aren't showing (which I'm trying to get fixed) I like how the blog looks. It's easier to manage and the blog doesn't take as long to scroll to the bottom. What do you think?

Sunday, September 13, 2009

Cricut Celebrates it's 100th Cartridge - Week 1

Cricut is celebrating their 100th cartridge—Winter Woodland! They are giving away 100 cartridges over the next five weeks (20 per week). To enter the contest we need to post a reply on the weekly thread over on the Cricut Message Board and to get an extra entry, we can post a link to the product details for Winter Woodland on our blog.

This is a terrific cartridge and I've been really wanting to try it! Take a look. You will love it! Here is the link.http://www.cricut.com/shopping/ProductDetails.aspx?id=361&s=1&sc=2

Saturday, September 12, 2009

Sheep Party Favors

sheep

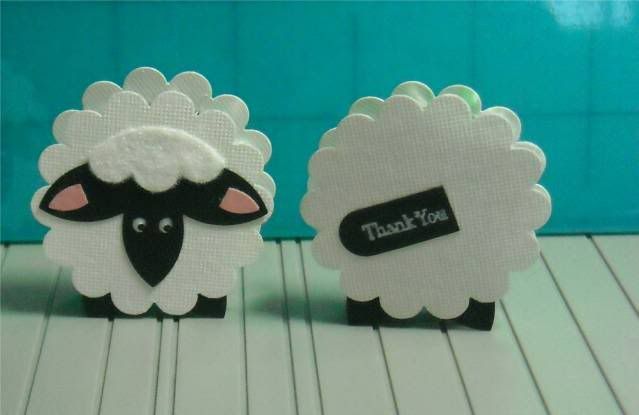
I'm hosting a Stampin Up party soon and needed to create party favors. I saw these cute sheep made using punched shapes and decided to recreate them. I enhanced the design a bit by adding the ears and flocking. I think these are so cute, especially since they stand up!

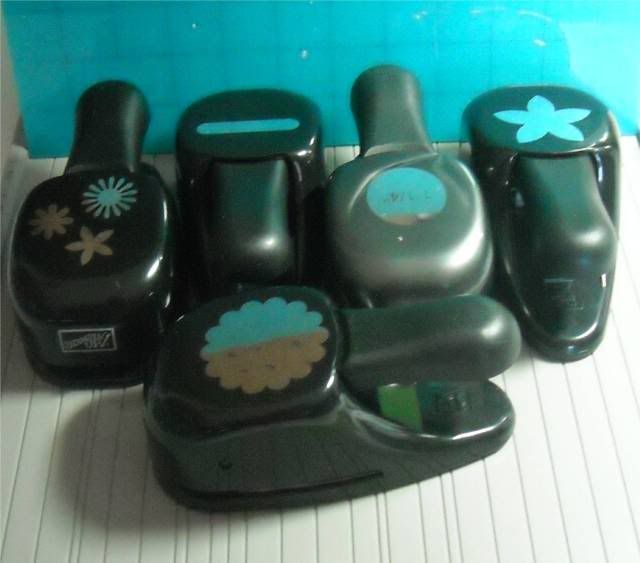
These use 5 different punches: word window, 5 petal, scallop circle, 1 1/4" circle, and a retired punch that goes with the "Looks Like Spring" stamp set.

sheep punches

The sheep is made by punching out 3 white scallop circles. Use the 1 1/4" punch to cut off 3 scallops. This will be the fur on the head of the sheep.

Punch out 2 black 5 petal flowers. Use sissors and cut off 3 petals (as a group). This will be the face of the sheep. The remaining 2 petals become the feet. Do this to both punched flowers. You will have 1 extra face. The feet are glued to the inside of the scalloped circle like in the picture below with just the tips of the petals showing on the front side.

Photobucket

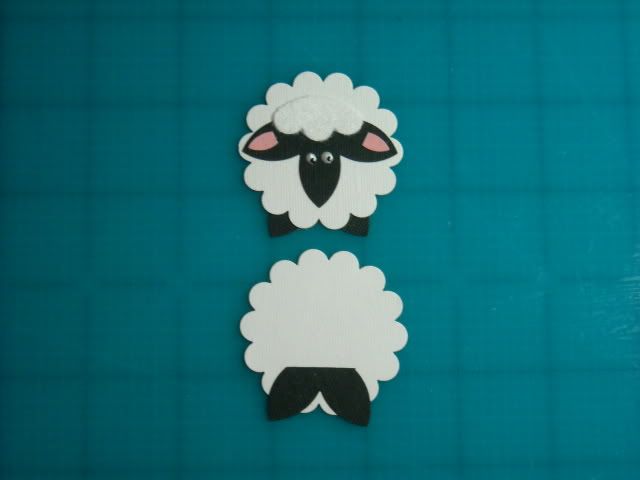
Using just the small 5 petal flower punch out a pink flower. Cut off 2 of the petals individually. These will be the inside of the ears.

The tail is made by punching out a piece of black cardstock with the word window punch. Use sissors to cut it off so it is only 1/4" long. I decided to make the tail a bit larger and stamped the "Thank You" using the Lots of Thoughts stamp set in white pigment ink.

I flocked the piece that is the fur over the face before I glued it by running it through my Xyon and pressing white flock on the sticky side.

To make the eyes put 2 tiny drops of white liquid pearls on the face and let sit until totally dry. Then I took a sharpie marker and made 2 small black dots on the white eyes.

When you have your front and back done, use adhesive to stick them to a peppermint patty. See how they stand up on their own? Aren't they just toooooo cute? And so very easy to make. I finished 14 of them in 1 hour.

Monday, September 7, 2009

Trying new techniques....

Cat's Meow

A friend came over yesterday and we spent the entire day playing with techniques we had not tried before. It was a ton of laughs as we messed up, created a huge mess, and generally had a great time. Since she lives in my building we both kept bringing out more and more supplies. Eventually my dining room table looked like a scrapbook store! But it was fun to see what we could come up with.

One of the techniques we tried was using Tim Holtz Distress Inks, Masks, and Perfect Pearls. I created the background of this card by stamping a script background stamp first. I cheated and used Stazon Dove Gray but I didn't want the image to smear. Next we applied masks from one of the mini-mask sets then went over the card using Distress Inks. We used Broken china, Peeled Paint, Dried Marigold, and Mustard Seed. I love how it turned out so I decided to finish it into a card.

I added the cat stamp which is an old woodmounted stamp by a company called Diamonds. I used Aged Mahogony distress ink and while it was still wet applied copper Perfect Pearls. When I brushed off the excess powder the cat has a super copper shimmer. I added the notes and the saying (which is from a TAC set) and there you have it!

This is a fun technique to try. You don't have to be precise. Just smoosh the colors onto the card and see what you get. Give it a try!

Saturday, September 5, 2009

Birthday Butterfly

Birthday Butterfly

I had fun creating this birthday card. I used Stampin Up's God's Beauty stamp set. I stamped the images with Stazon Jet Black ink and used a water brush to color the images. The butterfly was colored with YoYo Yellow and Marigold Morning inks. Added pearls to the flower centers and glitter to the butterfly. I lightly inked the lower half of the card with River Rock and the upper half with Soft Sky ink.

I also dusted off my trusty ole sewing machine and added stiching to the edges.

Here is the inside:

Birthday Butterfly 2

Thanks for looking.

Wednesday, September 2, 2009

Under The Weather

A freind is in the hospital and I wanted to take her a fun card to cheer her up. This stamp set from Stampin' Up is so cute.

Under the Weather

I did use a new technique on this one. I didn't have the right color of brads so I used silver ones and inked the tops with pigment ink and covered with clear embossing powder. Then used a heat gun to set it. This is a good technique to know since there are so many color variations of cardstock and you never seem to have matching brads.

The card is made using groovy guava cardstock and Stampin' Up Designer paper. The dark green cardstock is from Prism.

I used Stampin' Up's scallop border punch for the edges and a white gel pen for the dots.

The inside says... "Sorry to hear you're under the weather, hope tomorrow you are feeling much better".

Sunday, August 23, 2009

Etched Plate

Ok... last post for today! I'm finally catching up. My first attempt at glass etching. This plate was for my Mother's 80th Birthday. I learned that Wall Pops work great for cutting out the stencils on the Cricut, but I sure could have used the transfer tape. All in all it was pretty easy to do. I think I applied more etching cream than what was really needed but wanted to make sure I didn't miss any spots. As it turned out I still had a couple of tiny areas that didn't etch so I went back and applied a bit more cream using a toothpick and that worked great. Sorry for the yucky picture. I just could not seem to get a good one.

Etched Plate

I used 3 different Cricut cartridges to make this. First I chose the leafy swirls from Happily Ever After. I welded 3 together in an arch using Desing studio. The Happy Birthday was from Beyond Birthdays. The word Mom gave me the biggest challenge. Have you ever created something in Design Studio only to realize that the cartridge you used is NOT one you have? Well, silly me did just that. I originally selected Lyrical Letters and it matched the Happy Birthday perfectly. When I got ready to cut it dawned on me that I didn't have that cartridge! (Guess what cartridge will be my next purchase!) So I went back and used the one from Beyond Birthdays. Not too bad for my 1st try?

Bugawumps - Very Sorry...

Another Bugawumps card and a short story. This is a simple card but I had so much fun coloring it. I also realized something. I use a lot of the finger tip sponge daubers for inking edges. I have one for each of my inks. I seem to use my Walnut Distress Ink so much that the sponge is starting to deteriorate! I was going to toss it out and start a new daubler when I realized that the "fuzzy" edges of the sponge were creating the coolest markings. Take a close look at the edges of the image. See the small lines it created? I love this look! So, moral of this story? Don't toss it out!

Bugawumps - Sorry

I stamped the image using Stazon Black onto Stampin' Up's Whisper White cardstock. I created a mask for him and then stamped the grass. He is colored with Prismascolor pencils and a silver glitter pen for the wings. I sponged Stampin' Up Soft Sky ink first then went around the entire image with Old Paper Distress ink. Lastly I added a small border of Walnut ink to the whole thing. Since this card was for my nephew I added the wiggly eyes to the image. Isn't he cute?

Just Because Card

Sometimes, when you least expect it, a quick card turns out great! I love how this card turned out and I have to admit that I made it in under 1 hour! That's a record breaker for me since most of the time I agonize over a card for days at a time.

Just Because

I used my Cuddlebug and Spellbinder Oval Nestabilities to cut out the ovals and scalloped ovals. The leaves were stamped using Stazon Olive ink. The branch is a stamp from a Stampin' Up set but the little flowers and the butterfly are $1 clear stamps. I added stickles to the leaves, flower centers and butterfly. The edges were inked with Distress Ink called Aged Mahogany. The paper is from my stash and the cardstock is Stampin' Up. I was having trouble finding just the right ribbon so I added 2 different ones. Hope you like it as much as I do!

Friday, August 21, 2009

Apple Tree Birthday

I had a request to make a card for a gentleman that was having his 70th birthday. He loves his apple trees so it was a great excuse to pull out one of my favorite stamps.... The apple tree from Cornish Heritage Farms. This is a simple card but turned out very nice.

Birtyday Tree

I used the Storybook cartridge to cut out the label shapes. And colored the image with prismacolor pencils. The apples were done with red liquid pearls.

I put an Irish Blessing on the inside. I think it fits with the card nicely.

Birthday Tree Inside

Tuesday, August 18, 2009

Wall Pops & Jet Max Cubes

I've been super busy organizing, and decorating my scraproom. I picked up several more Jet Max cubes which started the entire process. I spent several days putting them together, then several more days moving everything around. It was also a great time to cull out those things I don't want or will not use. Then I decided I needed to add a little decoration. Since I live in an apartment stencils or painting is not allowed. Wall Pops to the rescue!

Here are pics of my newly organized room and my first Wall Pops project. It came out pretty cute. Oh, I had a left over flower and vine so my cricut got dressed up too!

Photobucket


Photobucket

Photobucket

Photobucket

I also was busy finishing an etched plate for my Mother's birthday and a card for a friend. I'll post those later. Now I'm off to get some rest! LOL

Saturday, August 8, 2009

Happy Anniversary

A quick card for my Son & DIL's 2nd anniversary. I picked up this cute Whippersnapper stamp at a warehouse sale they had a few months back. Stamped the image onto very vanilla Stampin Up cardstock using Stazon Jet Black ink. Then colored the image using prismacolor pencils and the MCPT. I highlighted the image by sponging around it with River Rock ink. I used a gold leafing pen around all the edges. Stickles were added to the hearts and to the turtles.

Photobucket

Enjoy!

Thursday, August 6, 2009

It's A Girl

A co-worker and his wife just had a baby girl. I made this card for them using my "comfort" zone techniques. I love to doodle. The stitching is hand doodles. I also used a Scalloped Nestability and cut it so the bear looks like it is peeking out from the bottom layer. The words were cut from the New Arrival cartridge and glittered. Gotta love bling!

Photobucket
I stamped the bear and colored with prismacolor pencils. Then I cut it out and pop-dotted onto the scallop. I made a tiny bow and glued on the bear. There are red stickles on the heart too. Added lots of tiny pearls. The inside says "Among the world's most precious gifts, among it's precious pearls, God smiles down upon the world and sends us little girls!"

Sunday, August 2, 2009

Love them bugs....

Hope you are all having a relaxing Sunday. I just got home from a brunch at a friends. We each brought a dish-to-pass and there was so much food I'm not sure I'll eat again for a couple of days.

Here is another Bugawumps card. This time a birthday card for my BIL. Men are so hard to make cards for! It is a 5" square card. I don't make many square ones since the Post Office charges more to mail them but this one I'm delivering in person.

Photobucket

I computer generated the inside to match (blocked out his name from the photo) and I think it came out very close.

Photobucket

I really like the bug noises paper. Found it at a LSS. The music notes are not from Bugawumps, but all the other stamps are. Enjoy.

Sunday, July 26, 2009

King For A Day Card

I needed a card for my 23 yr old nephew's birthday. What kind of card would someone his age like? I decided to use my new "Card Game" stamps from Stampin Up.

Photobucket
The suits DP is Stampin Up's Jackpot. I inked the edges with River Rock and stamped the birthday wishes from Sincere Salutations.

The black cardstock was run through the Cuddlebug using one of the new embossing folders called diamonds.

The gold scallop was punched with the EK Success Card Suits border punch. I also punched the border punch in red then took the shapes and glued them onto the center of the diamonds.

I added a black ribbon and some red buttons for an accent.

I stamped the King for a Day using stazon black then colored with markers. I used a glitter pen also, but it doesn't show up very well. I created a red mat for the center card and used pop dots to put it on the card.

Photobucket

The inside is a computer generated sentiment. I used the Stampin Up Wheel to create the red suits on the cardstock. Since it didn't want to stamp cleanly I decided to go with that and tore a hole in the center and inked the edges with River Rock to give the whole thing a distressed look.

Not wanting to waste anything I used the shapes left over from punching the gold scallop and randomly glued them to the inside also.

Sure hope he likes it. You never know with guys!

Sunday, July 12, 2009

Win $1,000 at TheCuttlebugSpot.com!

Well, lets give this a try! I enjoy all the terrific cards and techniques that I learn on The Cuttle bug Spot and now they are having a contest that is unbelievable!!!!!

"The Journey to 1,000"! They are trying to reach 1,000 followers by the end of July and need our help. To enter all you have to do is go to their site, sign up as follower and complete a few easy steps and you could win a $1,000 gift certificate to Custom Crops (www.CustomCrops.com)! GO NOW and check it out at www.TheCuttlebugSpot.com

Roses In Winter

I found a very nice Stampin Up stamp set at a garage sale called Roses In Winter. It is a retired set from 2003 and it is also a 2-step set. Since this is my newest passion I used this set to create a card for my Mother's 80th birthday.

Photobucket


The rose was stamped using Stampin Up's Lovely Lilac. I stamped off twice with the large rose and smooshed it 1/4 turn to the right. Then I stamped off once with the medium rose and smooshed it also. Finally I stamped the center (didn't stamp off) with a smoosh. I like how it blurs the edges. The stems were stamped with Mint Melody and again with River Rock. I stamped off once for both of them.

I used versamark and stamped the stems on the background cardstock. This is Prism cardstock called Medium Willow.

I added a strip of Basic Grey DP and inked the edges with Walnut Stain Distress Ink.

Add ribbon, lace and brads to finish up the card. (The picture is a little dark, it is very pretty in person)

Sunday, July 5, 2009

My Stampin Up order came in!

I just received my latest Stampin Up order and was so excited to try my new Stamp-a-ma-jig. This tool is just a blast to use, and so easy! I picked up a couple of older stamp sets at a garage sale a couple of weeks ago. I made this simple card using a retired stamp set called Definately Decorative Daisy. It is a 2-step set from 2000. If you haven't tried 2-step stamping I highly recommend it.

Photobucket

I used Prism cardstock in Papaya Puree Light and Papaya Puree Dark. The daisy background was stamped using Groovy Guava. Then I stamped the petal outlines in Chocolate Chip. I cut out the flower and added a button with rust colored floss. The stem, leaves, and bee were all stamped directly onto the cardstock. Of course I added some yellow stickles to give the bee some bling and a lace border at the bottom.

I wanted to try the smaller flower that came with this set so I used that on the inside.

Photobucket

The sentiment is from Cornish Heritage Farms. I think I'll send this to a friend of mine just to brighten up her day. Hope she likes it!

Busy, busy, busy....

I'm sorry that I haven't posted in a couple of weeks. Things have been so hectic around here. I had to prepare for a yard sale this weekend and have also been working on invitations for a Tupperware Bingo night I am hosting.

The invites came out very cute (if I do say so myself!) LOL I used the cricut and cut the letters out using the Keystone font. I love the nice block letters. A lot of pop dots on each layer of the bingo ball to give it that 3-d effect. The inside was computer generated, printed onto white cardstock and matted to match.

Photobucket

Photobucket

Saturday, June 13, 2009

Teacher Appreciation

I was asked to make a teacher appreciation card. I've never done one before but decided to give it my best shot. Here is what I came up with. I also made the cute paper clips to go with.

Photobucket

The apples were stamped with stazon black and colored in with a Stampin Up marker. I covered them with glossy accents to give them that terrific shine and 3-d effect. When they were dry I punched them out using a 1 1/2" circle punch. I used 2 scalloped punched circles for each clip, one for the front and one for the back.

I found the notebook paper at HL. I cut it down to fit and punched 3 holes. I tore the paper from the hole to the edge then distressed all the sides. I inked the edges with walnut stain distress ink and used the old paper distress ink to "dirty-up" the paper.

I hate my handwriting but decided that writing the saying by hand was the best way to get it on the paper and stay within the lines. I added stickles to the A+ and doodled the white dots.

I mounted the notebook paper onto Dark Autumn Red cardstock then on a black mat. The card base is a green that matches the leaves in the apples.

The inside is simple with a black mat and a small piece of the notebook paper. I left it blank so my friend can write what she wants to the teacher.

All in all I think this is a cute card and I love the paper clips!

Wednesday, June 3, 2009

Blog candy at Lisa's Stampin! Weblog

Check out the blog candy Lisa is offering at her terrific site! This is great!
Click here Be sure to check out her June specials also.

Sunday, May 31, 2009

Ad Inspiration Challenge #16

On the cricut message board there is a challenge that uses this ad from Lowe's
Photobucket

I wanted to make a simple "Hi There" card for an older gent that lives in my building. He is a real sweetie and we share the garage. I haven't talked to him in a couple of weeks. He goes out every morning to get his newspaper so I thought it would be fun to surprise him with a card that I'm going to leave on his car door. When I saw the challenge everything just fell into place. I still have a hard time designing cards for men.

Photobucket

I don't know who the paper is by. I was at Hannah's a couple of months ago and they were selling 6x6 scraps of dp for a nickle a sheet. I picked up several sheets just to add to my stash. I cut the paper on the diagonal and trimmed it down a bit so I'd have a larger gap in the center. It is mounted on a pale blue cardstock, then on a "orangish red" cardstock, then on rust. I inked all the edges with Walnut distress ink.

The duck is a Studio G stamp that normally holds a 4 leaf clover. I used my SU black marker and colored everything but the clover. He is colored in with Marvy Embossing Markers and heat set with clear embossing powder. I used an oval nestability to cut him out.

The saying is from Whipper Snapper Designs that I stamped in Walnut then used a water pen and SU Creamy Carmel ink to highlight.

Here is a tip to get your brads lined up nice and even. I use a 5 x 7 sheet of needlepoint plastic canvas. Line it up with the edge of your cardstock and mark where you want the brads. Then use a hole punch where you marked and they will always be straight and evenly spaced.

Saturday, May 30, 2009

Cuddlebug Challenge - Be Inspired #33

Here is my entry for "Be Inspired #33 - Monogram and Ellie's Studio" over at the Cuddlebug Challenge Blogspot. I chose to create a monogram card for a friend's birthday that is coming up this week.

This is a Flower Pot Pocket card. I found the instructions on the Split Coast Stampers website. It is a great card to make. There is so many options for decorating it.

EDITED TO ADD LINK TO INSTRUCTIONS: http://sluman.blogs.splitcoaststampers.com/2009/01/25/flower-pot-pocket-card/

Here is the card all together:

Photobucket

The overall height ended up being 7", so I am able to put this in a 5 X 7 envelope.

The flower pot was made from ivory cardstock cut per the instructions. I used an EK Success border punch on the front edge. Then ran it through my cuddlebug using the Perfectly Paisley embossing folder. To finish it off I stamped over the embossing with a background stamp inked with Stampin' Up's groovy guava ink. I love how this looks. The debossed areas don't catch the ink so your embossed design really stands out.

Here is a picture of the pot and pull-out card:

Photobucket

I used Prism cardstock in Desert Coral light, medium, & dark. The flowers were cut using the Cricut and Storybook cartridge. I cut the large flowers and shadows at 2" and the smaller flowers and shadows at 1 1/4". The large flowers were embossed with the swiss dots folder and the smaller flowers with the Spots & Dots folder. I inked all the edges with Tim Holtz Distress ink in Old Paper then added stickles on the swiss dot bumps. I also lightly inked over the embossing on the smaller flowers to accent the design.

To create the leaves I cut out the flourish (Storybook - page 56) and also the shadow. After I glued them together they were embossed with the D'vine Swirl folder. Then I cut up the florish and only used the side pieces as leaves.

The Monogram was cut from the Storybook cartridge at 1 1/2". I ran the letter upside down through my zyron sticker maker and added glitter over the entire letter for even more bling!

Here are some close ups for you to see the detail better.

Photobucket

Photobucket

Let me know what you think. I'd love to hear your comments.

Thursday, May 28, 2009

Great Blog Candy from a New SU Demo!

Pop on over to Lynou's blog and check out the great blog candy she is giving away to celebrate becoming a new SU Demonstrator. Here is the link Also if you are wanting some SU product why not shop her store. It's nice to support and help the new Demo's get started!

Monday, May 25, 2009

Happy Memorial Day!

I hope you are all having a wonderful day. I'm happily enjoying the day off work and creating more cards.

This is another Father's Day card. One of the ladies at work has a father that loves to garden so I thought this would make him smile...

Photobucket

And here is the inside:

Photobucket

Have you ever "lost" a stamp? I knew that I had a tiny bee stamp and it wasn't where I thought it should be. I started searching my scraproom and finally found it stuck among the stamps that still need to be mounted and put in my binders! I better get busy getting the rest of those stamps where they belong.

Sunday, May 24, 2009

Cuddlebug Challenge - Butterflies

I have entered this card in the challenge over at the cuddlebug challenge blog. I don't have the cuddlebug butterfly and heart die/folder so I used my cricut and cut the butterfly from my new Home Decor cartridge at 2". I then ran it through the cuddlebug using the swiss dots folder. To highlight some of the dots I used a white gel pan and also put clear rhinestones on some random dots. This is also my first "joy fold" card and I have to say it was a lot of fun to create. I got the information from SCS. Stickles were add to parts of the paper to add even more bling!

Hope you enjoy!

Photobucket

and here is the inside:

Photobucket